HTML 파일 작성
- hello-request-form.html
<!DOCTYPE html>
<html lang="ko">
<head>
    <title>Hello Request</title>
</head>
<body>
<h2>GET /request/star/{name}/age/{age}</h2>
<form id="helloPathForm">
    <div>
        이름: <input name="name" type="text">
    </div>
    <div>
        나이: <input name="age" type="text">
    </div>
</form>
<div>
    <button id="helloPathFormSend">전송</button>
</div>
<br>

<h2>GET /request/form/param</h2>
<form method="GET" action="/request/form/param">
    <div>
        이름: <input name="name" type="text">
    </div>
    <div>
        나이: <input name="age" type="text">
    </div>
    <button>전송</button>
</form>

<br>

<h2>POST /request/form/param</h2>
<form method="POST" action="/request/form/param">
    <div>
        이름: <input name="name" type="text">
    </div>
    <div>
        나이: <input name="age" type="text">
    </div>
    <button>전송</button>
</form>
<br>

<h2>POST /request/form/model</h2>
<form method="POST" action="/request/form/model">
    <div>
        이름: <input name="name" type="text">
    </div>
    <div>
        나이: <input name="age" type="text">
    </div>
    <button>전송</button>
</form>
<br>

<h2>POST /request/form/json</h2>
<form id="helloJsonForm">
    <div>
        이름: <input name="name" type="text">
    </div>
    <div>
        나이: <input name="age" type="text">
    </div>
</form>
<div>
    <button id="helloJsonSend">전송</button>
</div>
<div>
    <div id="helloJsonResult"></div>
</div>
</body>
<script>
    // GET /star/{name}/age/{age}
    const helloPathForm = document.querySelector("#helloPathFormSend")
    helloPathForm.onclick = (e) => {
        const form = document.querySelector("#helloPathForm");
        const name = form.querySelector('input[name="name"]').value;
        const age = form.querySelector('input[name="age"]').value;
        const relativeUrl = `/request/star/${name}/age/${age}`;
        window.location.href = relativeUrl;
    }

    // POST /hello/request/form/json
    const helloJson = document.querySelector("#helloJsonSend")
    helloJson.onclick = async (e) => {
        const form = document.querySelector("#helloJsonForm");

        const data = {
            name: form.querySelector('input[name="name"]').value,
            age: form.querySelector('input[name="age"]').value
        }

        const response = await fetch('/request/form/json', {
            method: 'POST',
            headers: {
                'Content-Type': 'application/json',
            },
            body: JSON.stringify(data),
        })

        const text = await response.text(); // read response body as text
        document.querySelector("#helloJsonResult").innerHTML = text;
    };
</script>
</html>
Controller와 HTTP Request 메시지
- HelloRequestController.java의 전체 코드는 하단에 올려두었다.
1. @PathVariable
@Controller
@RequestMapping("/request")
public class HelloRequestController {

    @GetMapping("/star/{name}/age/{age}")
    @ResponseBody
    public String helloRequestPath(@PathVariable String name, @PathVariable int age) {
        return String.format("Hello, @PathVariable.<br> name = %s, age = %d", name, age);
    }
}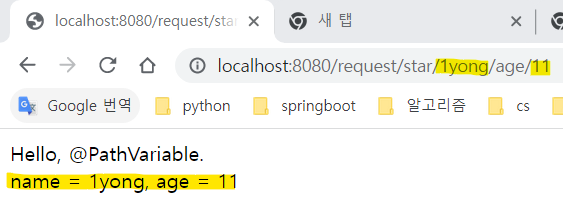
- localhost:8080/request/star/1yong/age/11 접속 ({name}과 {age}의 수정은 자유다..)
- URL에 세팅된 {name}과 {age} 값들을 @PathVariable을 통해 메소드로 받아온다.
- @ResponseBody에 의해 return한 문자열을 렌더링한다.
2. @RequestParam - @GetMapping
@Controller
@RequestMapping("/request")
public class HelloRequestController {

    @GetMapping("/form/param")
    @ResponseBody
    public String helloGetRequestParam(@RequestParam String name, @RequestParam int age) {
        return String.format("Hello, @RequestParam.<br> name = %s, age = %d", name, age);
    }
}
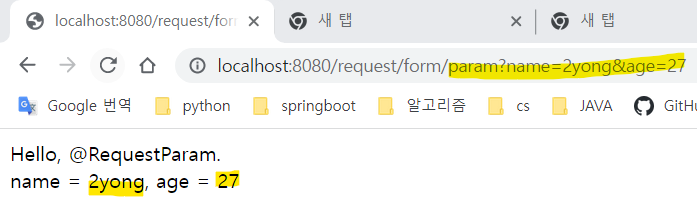
- @PathVariable과 비슷하게 @RequestParam을 통해 값을 받아오지만, URL의 끝 부분에 'param' 이라는 글자와 함께 ?, &을 통해서 값이 들어온다.
- 이를 쿼리 스트링이라고 하며, 쿼리 방식으로 전달된 값은 @RequestParam을 통해 받아올 수 있다.
- URL의 파라미터명(name)과 helloRequestParam 메서드에서 사용하는 변수명(name)이 반드시 일치해야 한다.
- @ResponseBody에 의해 return한 문자열을 렌더링한다.
3. @RequestParam - @PostMapping
@Controller
@RequestMapping("/request")
public class HelloRequestController {

    @PostMapping("/form/param")
    @ResponseBody
    public String helloPostRequestParam(@RequestParam String name, @RequestParam int age) {
        return String.format("Hello, @RequestParam.<br> name = %s, age = %d", name, age);
    }
}
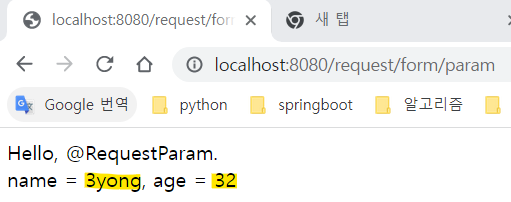

- POST 방식이므로 클라이언트가 요청을 했을 때 페이로드에 값이 전달된다.
- HTML의 form 태그에서는 GET, POST 중 어느 방식을 사용해도 @RequestParam을 통해 값을 받아올 수 있다.
- @ResponseBody에 의해 return한 문자열을 렌더링한다.
4. @ModelAttribute
- star.java
@Getter @Setter
@AllArgsConstructor
public class Star {
    String name;
    int age;
}- HelloRequestController.java
@Controller
@RequestMapping("/request")
public class HelloRequestController {

    @PostMapping("/form/model")
    @ResponseBody
    public String helloRequestBodyForm(@ModelAttribute Star star) {
        return String.format("Hello, @RequestBody.<br> (name = %s, age = %d) ", star.name, star.age);
    }
}


- 위와 마찬가지로 페이로드를 통해 값이 전달되었다.
- 위에서는 @RequestParam을 통해 값을 하나씩 전달받았지만, 이번에는 @ModelAttribute를 통해 객체(Star) 형식으로 값을 한꺼번에 전달받았다.
- 객체 형식으로 값을 전달할 경우에는 객체의 필드와 클라이언트 쪽에서 전송하는 key가 정확히 일치해야 한다.
- 전달받은 값은 객체의 필드값(star.name, star.age)으로 사용할 수 있다.
- @ModelAttribute를 통해 값을 전달 받는데 사용하는 객체 코드에는 반드시 @Setter가 작성되어야 한다.
5. @RequestBody
@Controller
@RequestMapping("/request")
public class HelloRequestController {

    @PostMapping("/form/json")
    @ResponseBody
    public String helloPostRequestJson(@RequestBody Star star) {
        return String.format("Hello, @RequestBody.<br> (name = %s, age = %d) ", star.name, star.age);
    }
}

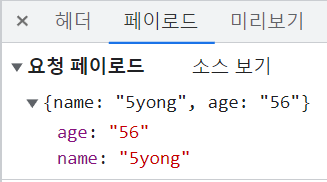
- 다섯번째 예제에서는 위와 다르게 HTTP body안에 JSON 형식으로 값이 넘어간다.
- JSON 형식으로 값이 넘어 왔을 경우, @RequestBody을 통해 그 값을 받을 수 있다.
- HelloRequestController.java (전체 코드)
package com.sparta.springmvc;

import org.springframework.stereotype.Controller;
import org.springframework.web.bind.annotation.*;

@Controller
@RequestMapping("/request")
public class HelloRequestController {

    @GetMapping("/form/html")
    public String helloForm() {
        return "hello-request-form";
    }

    @GetMapping("/star/{name}/age/{age}")
    @ResponseBody
    public String helloRequestPath(@PathVariable String name, @PathVariable int age) {
        return String.format("Hello, @PathVariable.<br> name = %s, age = %d", name, age);
    }

    @GetMapping("/form/param")
    @ResponseBody
    public String helloGetRequestParam(@RequestParam String name, @RequestParam int age) {
        return String.format("Hello, @RequestParam.<br> name = %s, age = %d", name, age);
    }

    @PostMapping("/form/param")
    @ResponseBody
    public String helloPostRequestParam(@RequestParam String name, @RequestParam int age) {
        return String.format("Hello, @RequestParam.<br> name = %s, age = %d", name, age);
    }

    @PostMapping("/form/model")
    @ResponseBody
    public String helloRequestBodyForm(@ModelAttribute Star star) {
        return String.format("Hello, @RequestBody.<br> (name = %s, age = %d) ", star.name, star.age);
    }

    @PostMapping("/form/json")
    @ResponseBody
    public String helloPostRequestJson(@RequestBody Star star) {
        return String.format("Hello, @RequestBody.<br> (name = %s, age = %d) ", star.name, star.age);
    }
}'Spring' 카테고리의 다른 글
| [Spring] DI, DIP, IoC, 컨테이너 (0) | 2023.04.24 |
|---|---|
| [Spring] Controller와 HTTP Response 메시지 (4) | 2023.04.14 |


댓글